If you run servers in more than one location, you know the networking pain. Port forwarding, dynamic DNS, firewall rules, VPN configs that break every time your ISP changes your IP. I dealt with all of that for years before switching to Tailscale, and honestly, I wish I’d done it sooner. It’s the single tool that turned my scattered collection of machines into something that actually feels like one network.
Here’s how I use it across my entire setup: homelab, data center servers, laptops, phone, and everything in between.
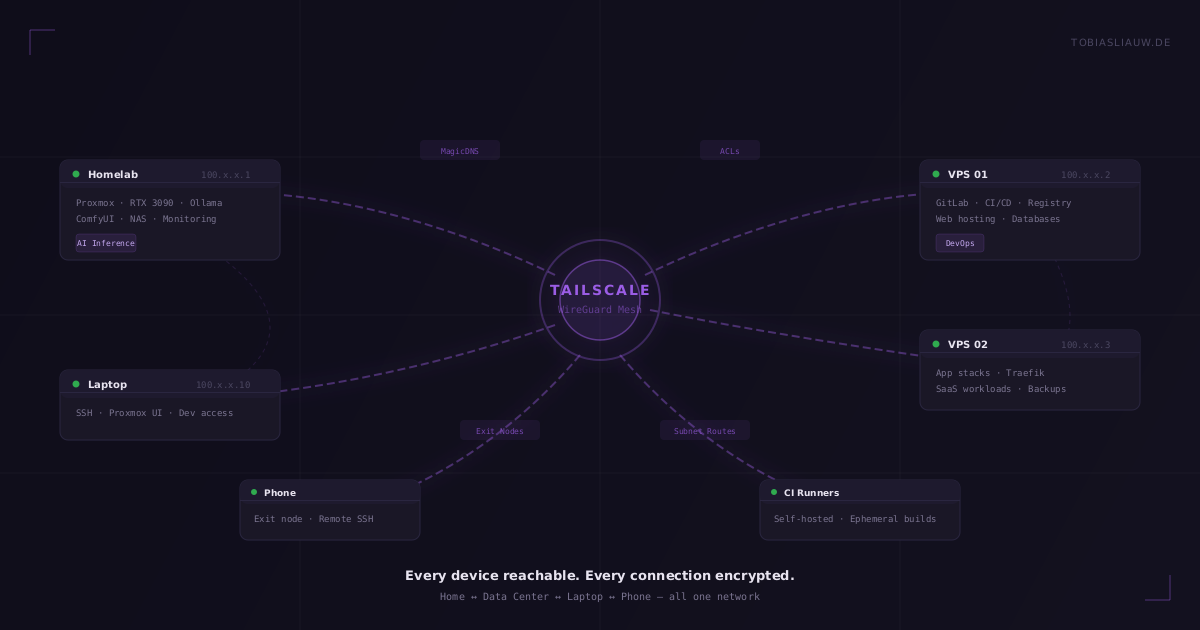
What Tailscale Actually Is
Tailscale is a mesh VPN built on WireGuard. Every device that joins your network (they call it a “tailnet”) gets a stable IP address that works no matter where it physically is. Your home server, a VPS in a data center, your laptop at a coffee shop: they all see each other directly, encrypted end-to-end, without any traffic routing through a central server.
The “mesh” part is key. Traditional VPNs route everything through a single gateway, which becomes a bottleneck and a single point of failure. Tailscale establishes direct peer-to-peer connections between devices using WireGuard tunnels. If two machines can reach each other directly, they will. If they can’t (because of strict NAT or firewalls), Tailscale uses relay servers (called DERP) as a fallback, but in practice, direct connections work most of the time.
My Network Layout
I run a mix of hardware across multiple locations:
- Home: A Proxmox host running VMs and containers, including an AI inference server with a GPU, a NAS, and various services.
- Data center: Multiple dedicated servers running Proxmox, handling web hosting, CI/CD, databases, and application workloads.
- Laptops and mobile: My daily drivers that need to reach everything above.
Before Tailscale, connecting all of this required a mess of SSH tunnels, port forwards, and a WireGuard server I maintained myself. Every time I added a new machine, I had to generate keys, update configs on every peer, open ports, and pray the firewall rules didn’t conflict. Adding a container on Proxmox meant another round of config changes.
With Tailscale, I install the client on a new machine, authenticate it, and it’s on the network. That’s it. No config files, no key distribution, no port forwarding.
Tailscale on Proxmox: Every Container Gets an Identity
This is where it gets really useful for homelab people. I run Tailscale inside individual LXC containers on Proxmox. Each container gets its own Tailscale IP and its own hostname on the network. My Ollama container is reachable as ollama.tail, my GitLab instance as gitlab.tail, my monitoring stack as grafana.tail.
The setup for LXC containers requires a small trick: you need to enable TUN device access in the container’s config. Add lxc.cgroup2.devices.allow: c 10:200 rwm and lxc.mount.entry: /dev/net/tun dev/net/tun none bind,create=file to the container config, then install Tailscale inside the container normally. It takes about two minutes per container.
For VMs, it’s even simpler. Install Tailscale like you would on any Linux machine. No special configuration needed.
MagicDNS: No More Memorizing IPs
Tailscale’s MagicDNS feature automatically creates DNS entries for every device on your tailnet. Instead of remembering that your home server is 100.64.x.y, you just use its hostname. This sounds minor but it changes how you think about your infrastructure.
I configure all my services to reference each other by Tailscale hostname. My web applications connect to databases using their mesh hostname. My CI runners pull from the container registry by name. If I move a service to a different machine, the hostname follows it. No hardcoded IPs, no DNS records to update manually.
One gotcha: MagicDNS can override your local DNS resolution. If you have devices on your LAN that you access by hostname (like a NAS), Tailscale might intercept those lookups. I ended up using IP addresses for local LAN devices and Tailscale hostnames for everything else. A minor annoyance, but worth knowing about.
ACLs: Not Everything Should Talk to Everything
Out of the box, every device on your tailnet can reach every other device. That’s convenient for getting started, but as your network grows, you want more control. Tailscale ACLs (Access Control Lists) let you define exactly which devices can talk to which services.
My ACL setup groups machines by role:
- AI inference: Only specific VPS containers can reach the Ollama API port. Random devices on the tailnet can’t.
- Management: SSH access to Proxmox hosts is restricted to my personal devices. No container or VPS can SSH into the hypervisor layer.
- Monitoring: The monitoring stack can scrape metrics from everything, but nothing else can reach the monitoring ports.
- Public services: Web-facing services are isolated. They can reach the database and the AI API, but not each other’s admin interfaces.
The ACL file is JSON and lives in the Tailscale admin console. It’s version-controllable (I keep a copy in my git repo) and changes take effect within seconds. No firewall rules to distribute, no iptables chains to debug.
The Killer Feature: VPS Calling Home for AI
This is my favorite use case and the one that saves me the most money. I run an RTX 3090 at home for AI inference (Ollama for LLMs, ComfyUI for image generation). My VPS instances in the data center need AI capabilities for various applications: content generation, embeddings, classification, image processing.
Without Tailscale, I’d either pay for cloud AI APIs (expensive at scale) or rent GPU instances (also expensive, and I’d still need to connect them securely). Instead, every VPS just calls home through the Tailscale mesh:
curl http://ollama.tail:11434/api/generate -d '{"model": "llama3.1", "prompt": "..."}'
The request travels through the encrypted WireGuard tunnel to my home network, hits the GPU, and the response comes back. Latency is around 15-30ms for the network hop, plus whatever the model inference takes. For batch processing and background tasks, this is perfectly fine.
The cost? Electricity for the GPU (around 10 EUR/month running 24/7) versus hundreds per month for cloud AI APIs or GPU instances. The Tailscale plan is the only recurring cost for the networking layer.
SSH Without Open Ports
Tailscale SSH is another feature I use constantly. Instead of exposing SSH on port 22 to the public internet, I use Tailscale as the transport. SSH is only reachable through the tailnet, which means:
- No SSH brute-force attempts. The port isn’t open to the internet at all.
- No need for fail2ban or port knocking. The attack surface is gone.
- I can SSH from my phone to any server without configuring anything. If the device is on my tailnet, I can reach it.
- Authentication is handled by Tailscale’s identity layer. I still use key-based SSH auth as a second factor, but the network-level access control is already done.
For Proxmox hosts specifically, this is a big deal. Hypervisor management interfaces should never be exposed to the public internet. With Tailscale, the Proxmox web UI and SSH are only reachable from authenticated devices on my tailnet.
Subnet Routing: Reaching Non-Tailscale Devices
Not everything can run the Tailscale client. Network switches, IPMI interfaces, old appliances. Tailscale’s subnet routing solves this. You designate one machine on a local network as a subnet router, and it advertises the local subnet to the rest of the tailnet.
I use this at home for my IPMI/BMC interfaces (which run on a dedicated VLAN) and for a few IoT devices that can’t run Tailscale. A Proxmox host on the same network acts as the subnet router. From my laptop anywhere in the world, I can access the IPMI web interface of my home server as if I were on the local network.
Exit Nodes: VPN When You Need It
Any Tailscale device can be configured as an exit node, which routes all internet traffic through that device. I use this when I’m on untrusted networks (coffee shops, hotels, airports). Instead of paying for a commercial VPN, I route my traffic through one of my own servers.
I have two exit nodes configured: one on a data center server (for speed) and one on my home network (for accessing geo-restricted content as if I’m at home). Switching between them is a toggle in the Tailscale app.
What I’d Improve
No tool is perfect. A few things I’ve run into:
- MagicDNS conflicts. As mentioned, it can fight with local DNS. If you have a local DNS server (like Pi-hole), you need to configure split DNS properly or you’ll have resolution issues.
- LXC setup isn’t automatic. Every new container needs the TUN device config added manually. I’ve scripted it, but it would be nice if Tailscale had a Proxmox plugin.
- Debugging mesh issues. When a connection goes through a relay instead of being direct, it’s not always obvious why. The
tailscale statusandtailscale netcheckcommands help, but the troubleshooting docs could be better. - Device limit on free tier. If you’re running Tailscale on every container individually, you hit the device limit quickly. The paid plans are reasonable, but it’s something to be aware of.
Is It Worth It?
For me, absolutely. Tailscale turned a fragmented collection of machines into a coherent network. I don’t think about networking anymore. I don’t debug VPN tunnels at 11pm because my ISP rotated my IP. I don’t maintain WireGuard configs across twenty machines. I just add a device, and it works.
If you’re running any kind of homelab or multi-server setup, Tailscale is probably the highest-value tool you can add. The time it saves on networking alone pays for itself, and features like ACLs, subnet routing, and exit nodes make it genuinely powerful, not just convenient.
I’ll write more about specific setups (Tailscale + Proxmox in detail, ACL patterns for homelabs, monitoring across a tailnet) in future posts. If you have questions about any of this, reach out.